
It’s easy to understand why the Stronghold S7 Pro is such a popular choice for roasting competition coffees. In 2022 and 2023, 3 out of 6 World Barista Championship finalists used coffee roasted on a Stronghold, including 2023's Brazilian champion Boram Um.
The Stronghold triple-heat system offers superb control over flavor development, while it’s compact size keeps batch sizes reasonable.
The recommended batch size is between 300g and 850g. This is where the airflow and all other parameters are optimal. Most profiles you’ll find on the public Stronghold Square platform use batch sizes in this range. In our personal experience a 600g batch size helps in getting an even roast, while having plenty of power available and enough beans in the drum to get a good reading from the bean temperature sensor.
Before we dive in the nerdy details, please always empty the chaff collector after every roast! When it fills up, the chaff gets close to the hot cyclone and might catch fire creating very unpleasant aroma’s. There is an emergency button on the front panel or on top of the right part of the roaster.
Never open the chaff collector during roasting, as that will disturb the airflow balance and possibly disturb your roast.
Every roasting machine generates 3 types of heat to the beans; conduction, convection and radiation. But only a Stronghold allows you to change the balance between these 3 types of heat application during the roast.
Conduction is influenced by the temperature of the drum, and the speed of the agitation.
Convection is controlled by the hot-air element that instantly heats fresh air blown into the roasting environment.
Radiation is controlled by 2 Halogen lamps that sit in the tower drum’s ‘ceiling’.
Start by setting the startup temperatures. There’s one for the bean sensor labeled “Internal” and one for the Tower Drum. Standard settings are 170° for Internal and 165° for the Tower Drum. The Internal temperature will be reached quickly, but the Tower Drum needs some more time, and is mainly heated by radiation from the Halogen lamps.
(We’ll get back to this)

Next, set the start settings for the 3 main control parameters, Hot Air, Halogen and Agitation. There are no hard rules and it’s completely dependent on the coffee you’ll be using, but if you’re aiming for a 8 minute roast with a 600g batch size, Hot Air should be around 8, Halogen above 5 and Agitation above 7 for a first trial. Adjust to taste! ;-)
You can change these settings by rolling up or down on the touchscreen.
If you’re roasting based on a previous profile, those settings can be checked by clicking “Reference setting” at the bottom of the preheat screen.
While the S7 Pro is warming up, you can add info to the profile by clicking on the upper-right icon (next to the profile name). This can also be added or edited during roasting, or afterwards.
You will hear a sound signal when the Stronghold is preheated and stable, so add the beans to the hopper above the drum, and press “start”. When roasting in manual mode, press “ok” on the pop-up.
During the roast you will see 2 graphs. The upper graph shows the Hot Air Temperature as the red curve, and the numbers can be seen on the right-hand axis (200-600°C). The Hot-air temperature is also shown left from the red release button.
This temperature is measured right after the hot-air element that heats fresh air entering the Tower Drum.
The left hand axis shows another temperatur range (80-200°C) and this is used by the Internal Temperature Curve (white, aka the “bean” temperature) and the Tower Drum curve (green).
The Internal Temperature is updated every second, with no smoothing.
The Turning point is marked automatically, and first crack can be marked with the ‘Crack’ icon in the lower right corner of the screen. (H-12)
You can zoom the curves in and out by using the 2-fingers zoom gesture. Go back to full screen by clicking the icon with the 4 arrows in the right-hand corner below f the first graph.
The Rate Of Rise Curve (white) in the second graph below is calculated from the Internal/Bean Temperature curve and is updated every second with no smoothing. It shows a value of temperature increase measured over 30 seconds. So reaching values of around 5°C after turning point is in the normal range, with values of around 3°C are expected by the end of the roast.
The other curves in the lower graphs are your input settings for Hot-Air, Halogen and Agitation.

Lowering the target Tower Drum temperature will shorten the time between batches, but will also slightly decrease the amount of conductive energy during the roast.
Next, set the start settings for the 3 main control parameters, Hot Air, Halogen and Agitation. There are no hard rules and it’s completely dependant on the coffee you’ll be using, but if you’re aiming for a 8 minute roast with a 600g batch size, Hot Air should be around 8, Halogen above 5 and Agitation above 7 for a first trial. Adjust to taste! ;-)
You can change these settings by rolling up or down on the touchscreen.
If you’re roasting based on a previous profile, those settings can be checked by clicking “Reference setting” at the bottom of the preheat screen.
While the S7 Pro is warming up, you can add info to the profile by clicking on the upper-right icon (next to the profile name). This can also be added or edited during roasting, or afterwards.
You will hear a sound signal when the Stronghold is preheated and stable, so add the beans to the hopper above the drum, and press “start”. When roasting in manual mode, press “ok” on the pop-up.
During the roast you will see 2 graphs. The upper graph shows the Hot Air Temperature as the red curve, and the numbers can be seen on the right-hand axis (200-600°C). The Hot-air temperature is also shown left from the red release button.
This temperature is measured right after the hot-air element that heats fresh air entering the Tower Drum.
The left hand axis shows another temperatur range (80-200°C) and this is used by the Internal Temperature Curve (white, aka the “bean” temperature) and the Tower Drum curve (green).
The Internal Temperature is updated every second, with no smoothing.
The Turning point is marked automatically, and first crack can be marked with the ‘Crack’ icon in the lower right corner of the screen. (H-12)
You can zoom the curves in and out by using the 2-fingers zoom gesture. Go back to full screen by clicking the icon with the 4 arrows in the right-hand corner below f the first graph.
The Rate Of Rise Curve (white) in the second graph below is calculated from the Internal/Bean Temperature curve and is updated every second with no smoothing. It shows a value of temperature increase measured over 30 seconds. So reaching values of around 5°C after turning point is in the normal range, with values of around 3°C are expected by the end of the roast.
The other curves in the lower graphs are your input settings for Hot-Air, Halogen and Agitation.
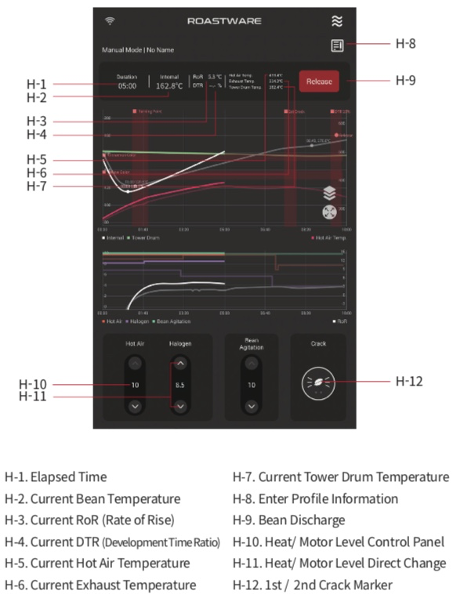
Below these graphs is the control panel. You can increase or decrease values with the up/down arrows, or tap the value and a pop-up screen will allow you to dial the exact value you want.
Right from the controls is the icon to mark first crack and second crack.
Tip!
The Hot-Air Control is very responsive compared to what you migh be used to from a gas drum roaster. So avoid making drastic changes, as going from e.g. 8 to 6 might stall your roast.
Making big changes to Halogen settings won’t have a big impact on your Internal/Bean Temperature curve and the associated Rate Of Rise but has a big impact on flavors in the cup.
Making changes to agitation will cause some effect on the Internal/Bean temperature curve as it allows more or less air to get in between the beans, changing the readings at the probe.
Tip 2!
Halogen is a very powerful control. The wavelengths generated are ideal to penetrate the beans deeper than other methods of heat application, which is very handy if you have very dense beans that require proper development without roasting too dark.
But there’s a flipside, using too much halogen power, especially in the later part of the roast when the beans are expanding, losing moisture, and getting britlle, might cause unwanted harsh and astringent flavors. You’ll notice that many roast profiles on the Stroghold Square platform dial back the halogen power as the roast progresses for this very reason.
We like the flexibility of Halogen, as it does allow you to tune acidity and body and allows for more complexity, but be aware of extreme settings with low-density coffees.
Tip 3!
Halogen radiation has a measureable effect on the Tower Drum Temperature, which is visualized by the green curve in the upper roasting graph.
If you drop the Halogen settings to 0 by the end of the roast, this will also have an effect on the time needed to preheat for the next roast.
So if your competition roasting time is limited, try these things to minimize between-batch preheating time:
- Keep the halogen settings by the end of the roast at setting 1-3
- Lower the tower drum setting during preheat (but this will lower your conductive energy while roasting)
- When pressed for time, you can start the roast even when the preheating hasn’t completely reached the desired drum temperature...